android加密技术——dex加密
前言
dex的加密应该是android加固中非常简单的加密手段了吧!前段时间在网上看博客,关于android加固的具体实现方法,看了作者的例子想起之前做过的一道华山杯的题好像也是对dex进行加密,然后翻出来发现这两个方法一模一样,连加密的方式都是异或0xff。所以主要写一下它的实现过程,解题思路都非常简单。
dex加固原理
1.待加固程序(apk)
2.加密程序(java层代码,主要用于提取apk中的dex文件,并加密dex文件,再将dex文件和解壳程序合并然后保存到新的dex文件中)
3.解壳程序
源程序apk;
加壳程序:
- 以二进制方式读出待加固apk,并进行加密处理。
- 以二进制方式读出解壳dex。
- 创建二进制数组,在结尾增加4个字节,存放待加壳apk的大小,拷贝dex和apk到新的dex中。
- 修改DEX file size文件头 ,修改DEX SHA1 文件头 ,修改DEX CheckSum文件头 。
- 将二进制数组写入到新建的dex文件中。
解壳程序:
- 从apk中读出dex文件,用zipentry写入到二进制数组中。
- 取被加壳apk的长度,把被加壳apk内容拷贝到newdex中 ,并解密apk
- 动态加载该dex。
整个实现的流程如上,接下来就把华山杯的Sheild.apk拿到jeb中看一下源码,由于我们在做题过程中加壳程序不是我们需要考虑的,我们只用看解壳程序并且找到这其中的解密程序,以及代码段被加密后的数据即可。还是先把上述流程转化为代码实现一下吧。
解壳程序
步骤一:找到apk中的dex文件,用到ZipInputStream,创建两个文件夹用于存储apk和so文件
创建目录:
|
|
从apk中获取dex:
|
|
从dex中得到源Apk文件:System.arraycopy复制待解密apk数据到指定文件中,进行解密,分析解密的apk文件,同样是使用ZipInputStream,得到apk中的dex和so文件
|
|
最后是动态加载运行我们解密出来的apk
关键的decrypt这个函数找到后就是对代码进行一个简单的异或0xff,所以模拟这个过程解密即可。
加壳程序
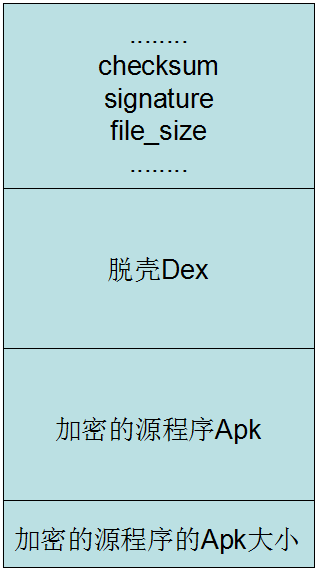
对于加壳程序要对dex的文件结构有一个大概的了解,主要是要涉及到修改文件头的几个字段。
先来看一下dex的文件结构

我们在加壳时需要修改上图中,红线括起来的三个部分,方法如下:
修改DEX CheckSum文件头,使用Adler32
|
|
修改DEX SHA1文件头,signature部分
|
|
修改DEX file_size文件头
|
|
Sheld.apk解题过程
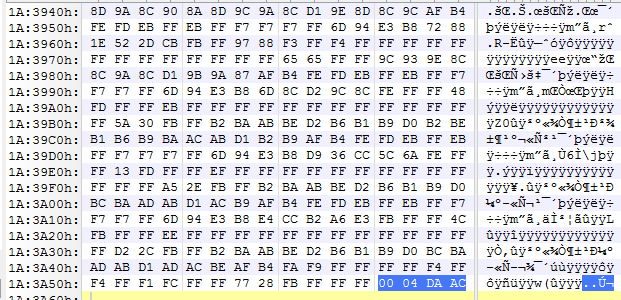
我们打开classes.dex
生成的dex文件,上图中选中部分为20字节的signature
文件末尾为apk文件大小:0x0004DAAC
加密的方法我们已经分析完了,所以解密时只需要读取最后四位为整个加密apk长度,然后再把加密后的代码读取出来进行解密,存在apk文件中即可,解密脚本如下:
|
|
最后我们生成了一个orignal.apk再把这个apk破解即可,逻辑非常简单,只是简单的base64,就不再叙述他的解密方法了。
总结
dex加密较为简单,特别是这种方法还将他放在java层就直接动态加载了,但是看了他的实现过程还是感觉比较有收获,主要在于实现过程中不仅仅是对加密方案的设计,还需要对整个dex文件的解析,文件结构,安卓的动态加载机制都要熟练掌握,所以难点应该是在开发这一块。而逆向的时候并不会考虑这么多。